 Save to Pinterest
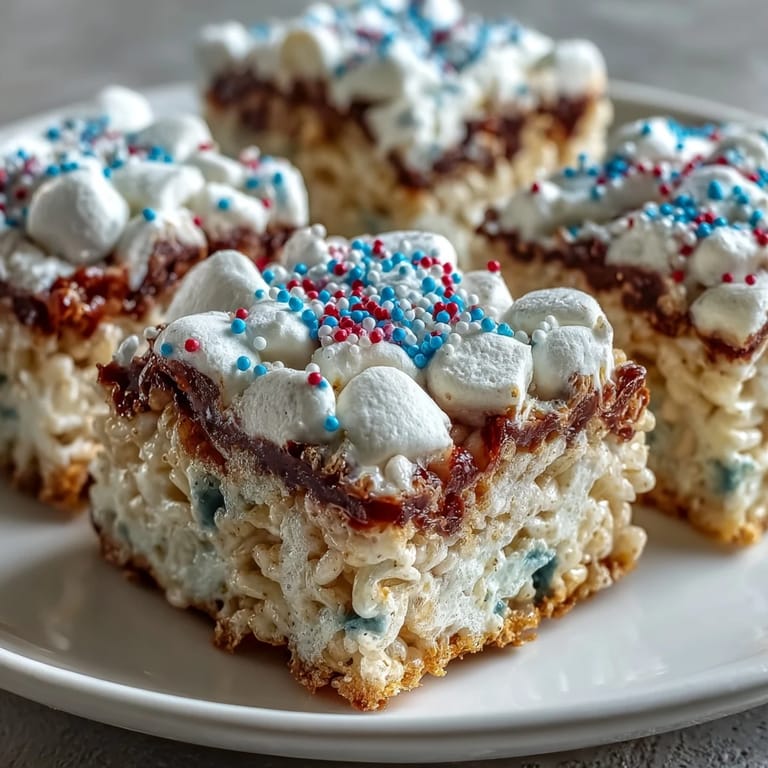
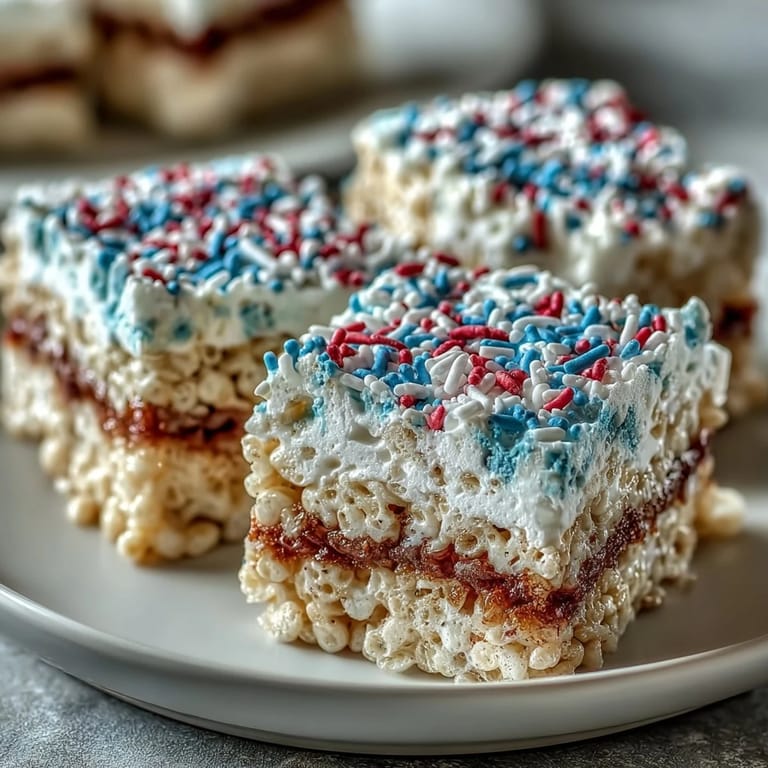
 My nephew burst through the kitchen door on the Fourth of July asking if we could make something red, white, and blue—no baking skills required. I remembered watching my mom layer Rice Krispies treats as a kid, but never with this kind of patriotic flair, so we decided to wing it together. What started as a casual afternoon project turned into the most requested dessert at every summer gathering since. The magic happened when we pressed that final blue layer and stepped back to see the stripes staring back at us from the pan. He's fourteen now and still texts me asking when we're making them again.
I brought these to a neighborhood picnic last summer and watched grown adults lean over the dessert table debating which layer was their favorite—some swore the buttery white middle was the star, others came back for seconds just for the visual payoff. One neighbor who usually brings store-bought cookies asked for the recipe three times before I finally texted it to her. That moment when food becomes part of the conversation instead of just background noise—that's when you know you've made something special.
Ingredients
- 6 cups Rice Krispies cereal: Use the original cereal for the most nostalgic crunch and color; store brands work fine but may absorb moisture differently.
- 1 (10 oz / 283 g) bag mini marshmallows: Mini marshmallows distribute color more evenly than large ones and melt faster.
- 3 tbsp unsalted butter, divided: Unsalted lets the marshmallow sweetness shine through without competing flavors.
- 1/2 tsp vanilla extract: This sneaks into the white layer and adds a subtle sophistication that keeps it from tasting one-note.
- Red and blue gel food coloring: Gel coloring is non-negotiable here—liquid versions will thin out your mixture and ruin the texture.
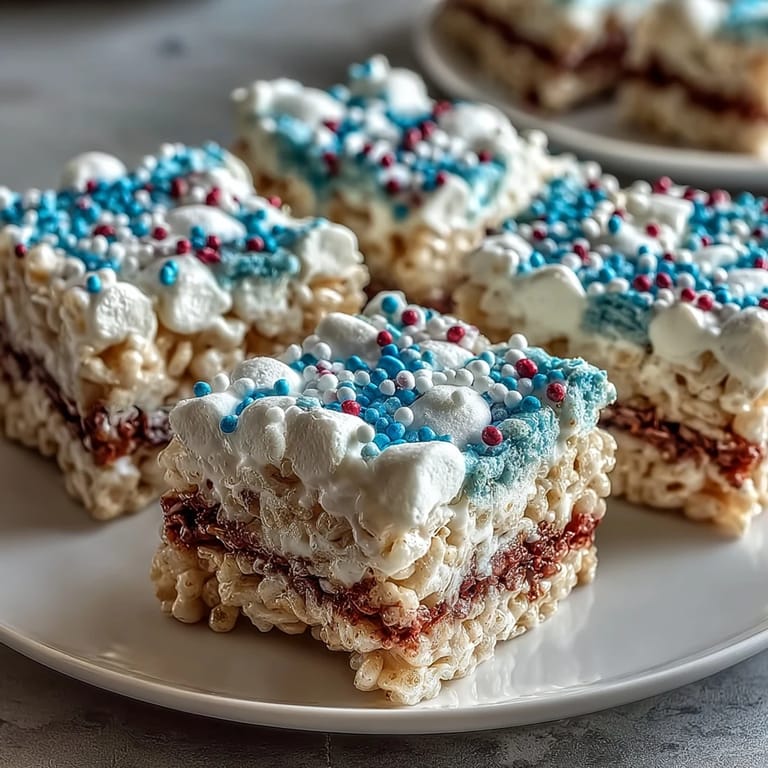
- Red, white, and blue sprinkles (optional): Add these while the top layer is still warm so they stick slightly rather than sliding around.
Tired of Takeout? 🥡
Get 10 meals you can make faster than delivery arrives. Seriously.
One email. No spam. Unsubscribe anytime.
Instructions
- Set up your workspace:
- Line your 9x9-inch pan with parchment paper and give it a light grease with butter or cooking spray. This step feels fussy but makes the difference between lifting out a perfect block and prying out crumbly pieces.
- Organize your portions:
- Divide your marshmallows and butter into three equal piles before you start melting anything. Having everything measured out prevents the panic of wondering if you've used too much.
- Make the red layer:
- Melt 1 tbsp butter in your saucepan over low heat, add one-third of the marshmallows, and stir until they're completely smooth and glossy. Add a few drops of red gel coloring and stir until you reach a shade you love—remember it'll look slightly darker once it sets.
- Mix in the cereal:
- Add 2 cups of Rice Krispies to your red marshmallow mixture and fold everything together until every cereal piece is coated. The mixture will seem thick and resistant at first, but it'll come together.
- Press the first layer:
- Grease your hands or a spatula lightly and press the red mixture firmly into the bottom of your pan, creating an even layer. Use the back of a measuring cup if your hands get tired—it works surprisingly well.
- Create the white layer:
- Wipe out your saucepan, melt another 1 tbsp butter, add the second portion of marshmallows, then stir in the vanilla extract. The vanilla scent is your signal that this layer will taste different and feel more refined than the others.
- Add the white Rice Krispies:
- Fold in 2 cups of cereal gently this time, as pressing too hard before you layer it could squish the red layer beneath. Carefully press this mixture over the red layer without pushing down too aggressively.
- Finish with blue:
- Repeat the melting process with your final butter and marshmallow portion, add your blue gel coloring, and fold in the remaining 2 cups of cereal. Watch the color deepen and shift as you stir—it's oddly meditative.
- Complete the tricolor effect:
- Press the blue layer on top with gentle but firm pressure, creating an even surface. If you want sprinkles, now's the moment while the top is still warm enough for them to stick.
- Let it set:
- Resist the urge to cut these for at least an hour—I learned this the hard way when I sliced too early and ended up with a beautiful mess. A full hour gives you clean, proud-looking squares.
- Slice and serve:
- Use the parchment paper to lift the whole block out, then slice with a sharp knife, wiping the blade between cuts for clean edges. Store extras in an airtight container where they'll keep for up to three days.
 Save to Pinterest
 There's something about presenting these treats on the Fourth of July that makes people smile before they even taste them—the red, white, and blue hits you immediately and brings back summer memories. My sister once told me that these treats made her think of simpler times, and I realized that food can be nostalgia on a plate when it's made with intention.
Why Gel Coloring Changes Everything
The first time I tried making these with liquid food coloring, I ended up with a sticky, separating mess that looked like someone had watered down a candy disaster. Gel coloring is concentrated enough that you get vibrant color without adding liquid, and your marshmallow mixture stays fluffy and holds its shape. Now I keep a small bottle of red and blue gel in my pantry year-round because once you know the difference, there's no going back.
The Secret to Clean Cuts
A hot, wet knife makes all the difference when slicing through these treats—the heat prevents the marshmallow from sticking and tearing. I keep a small bowl of hot water nearby and wipe my knife between each cut, which takes maybe an extra minute but gives you professional-looking squares. Nobody needs to know you're actually just using a simple trick instead of advanced baking skills.
Making Them Your Own
While the red, white, and blue version is perfect for Independence Day, this recipe is endlessly customizable for any celebration or mood you're in. You could do Halloween orange and purple, Christmas red and green, or even monochrome layers if you wanted something more understated. The technique stays the same—only the colors and maybe the toppings change.
- Add a pinch of sea salt on top of the white layer to balance the sweetness with a subtle savory note.
- Try using salted butter instead of unsalted for a buttered popcorn vibe that sneaks up on you.
- Make extra and freeze them in an airtight container; they thaw back to their original texture within minutes.
 Save to Pinterest
 These treats remind me that the simplest combinations often create the most joy, especially when they're shared on a day that matters. Make these once and they'll become your go-to, the recipe you text friends asking for when they bring them to a party.
Recipe FAQs
- → What type of food coloring works best for vivid layers?
Gel food coloring is preferred because it provides vibrant colors without making the mixture too wet, unlike liquid colorings.
- → How can I prevent the layers from sticking during preparation?
Lightly greasing your hands or spatula before pressing each layer helps to prevent sticking and creates even layers.
- → Can I add flavors besides vanilla to enhance the taste?
Yes, adding a pinch of salt or using salted butter can add depth to the flavor without overpowering the layers.
- → How long should the treats cool before slicing?
Allow the layered bars to set for at least an hour so they firm up properly for clean slicing.
- → What equipment is essential for making layered Rice Krispies?
A large saucepan for melting, a greased 9x9-inch pan lined with parchment, and spatulas for pressing and mixing are key tools.