 Save to Pinterest
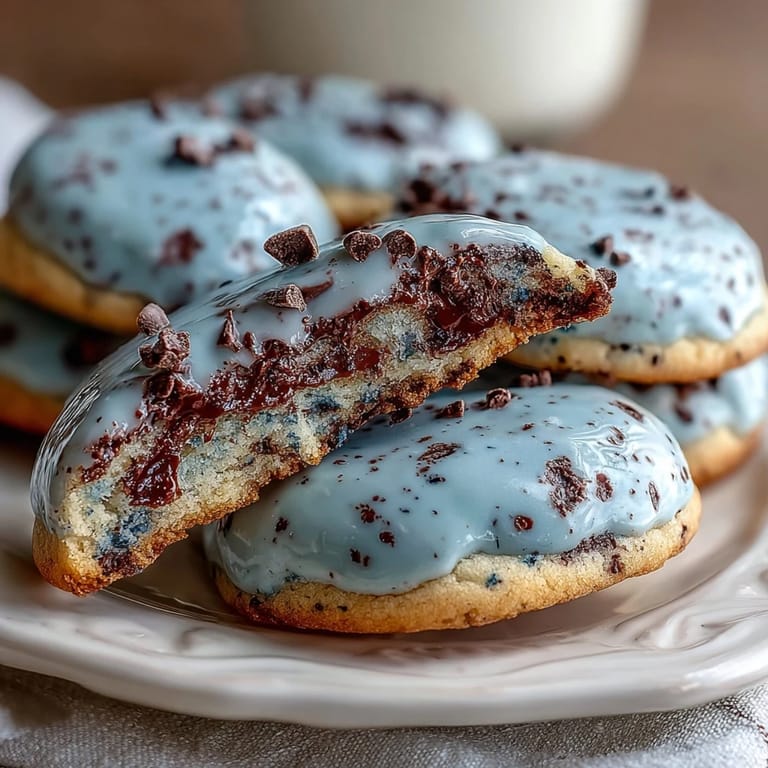
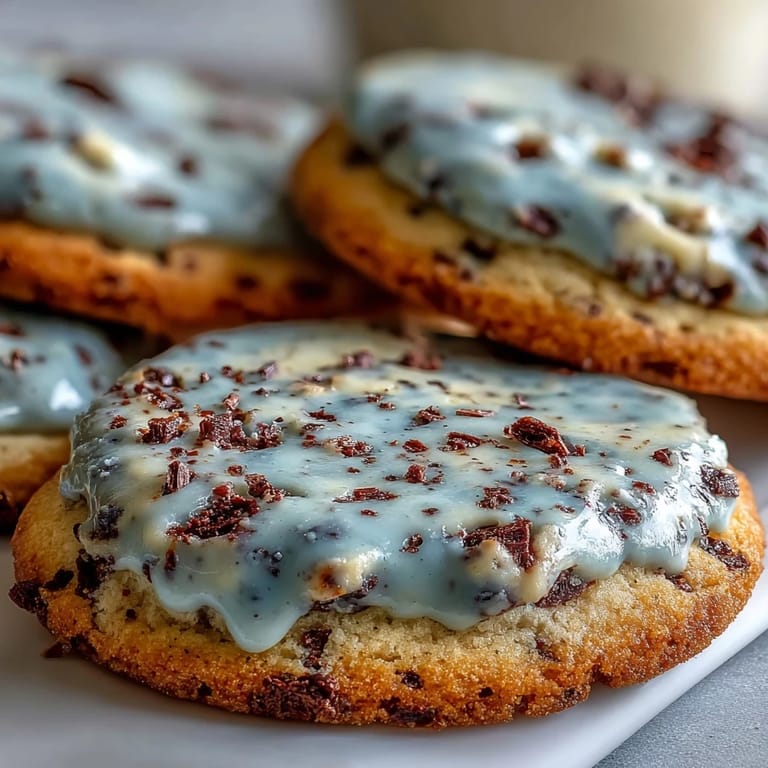
 The smell of sweet butter wafted through the kitchen last spring as I rolled out dough tinted the palest robin&aposs egg blue. I couldn&apost help grinning—my hands looked like I&aposs been painting Easter eggs, which in a way, I suppose I was. This recipe came to life after spotting a nest tucked in a blossoming magnolia; those speckled eggs nudged me to try making cookies that felt just as full of wonder. It&aposs a treat that invites playful creativity, and even cleanup somehow feels worth it once the little blue cookies dry to a delicate finish. Sometimes, the kitchen is all about following your curiosity right to something pretty delicious.
The first time I baked these for a neighborhood brunch, my daughter giggled at the &apospolka dot cookies&apos and insisted on helping with speckles. We made a joyful mess; cocoa splashes landed everywhere, but the kitchen felt alive with laughter and color. Those cookies disappeared before the plates were cleared, and the recipe quickly became my go-to for seasonal gatherings. I&aposs learned that the most memorable dishes are often tied to shared, slightly imperfect moments. Spring sunshine through the window made the icing set faster—and the day felt brighter, somehow.
Ingredients
- All-purpose flour: This provides structure without making the cookies tough; sift it for a crisper bite.
- Baking powder: A gentle lift keeps the cookies from spreading too much; measure carefully for uniform shapes.
- Fine salt: Enhances the buttery flavor; skip coarse salt for smooth dough.
- Unsalted butter: Room temperature butter blends more evenly and gives the dough its classic richness.
- Granulated sugar: The base for sweetness and crisp edges; creaming thoroughly makes all the difference.
- Egg: Binds and adds tenderness; make sure it&aposs at room temperature for smooth mixing.
- Vanilla extract: Brings in warmth and depth; pure vanilla really is worth the splurge.
- Almond extract (optional): Subtle, floral notes elevate the cookies; just a touch transforms the flavor.
- Blue gel food coloring: Yields that gentle robin&aposs egg hue without making the dough sticky or thin.
- Powdered sugar: For the icing&aposs smooth finish; sift it well to avoid lumps.
- Milk: Helps loosen the icing to a spreadable consistency; add slowly to avoid runny results.
- Light corn syrup: Adds glossy sheen and helps the icing set smoothly.
- Cocoa powder: The secret behind realistic chocolate speckles; mix it until totally smooth for best effect.
- Water: Needed for making the speckling mixture thin enough to flick.
- Food-safe paintbrush: A clean brush helps create the perfect speckles; a toothbrush works in a pinch.
Tired of Takeout? 🥡
Get 10 meals you can make faster than delivery arrives. Seriously.
One email. No spam. Unsubscribe anytime.
Instructions
- Toss and Whisk the Dry Ingredients:
- Measure flour, baking powder, and salt and whisk together, catching the earthy scent as you mix. The flour clouds will settle—don&apost rush.
- Cream the Butter and Sugar:
- With your mixer, beat butter and sugar until light and fluffy; watch it turn pale and airy in just a few minutes.
- Add Eggs & Extracts:
- Crack in the egg, pour the vanilla and almond extracts, and blend slowly until the mix looks silky smooth.
- Combine Wet and Dry:
- Tip in your flour mix, stirring gently until no streaks remain; overworking here can toughen the cookies.
- Tint the Dough:
- Add a few drops of blue gel coloring, mixing softly until the color is even but not overmixed—you want that soft pastel shade.
- Chill and Shape:
- Split the dough, flatten it into discs, wrap, and chill for at least 30 minutes; this step keeps your cookies tidy and easy to handle.
- Prep for Baking:
- Preheat the oven to 350°F and lay parchment on baking sheets; it&aposs a little step with big cleanup payoffs.
- Roll and Cut:
- Dust your surface and rolling pin, then gently roll out dough to a quarter inch; use an oval or egg-shaped cutter for that spring feeling.
- Bake:
- Arrange cookies an inch apart and bake 9 to 11 minutes; check for edges just set, not browned, and let them cool before moving.
- Make the Icing:
- Whisk powdered sugar, milk, corn syrup, and vanilla until glossy and smooth; tint it to match your dough for that robin&aposs egg vibe.
- Ice the Cookies:
- Spread or pipe icing onto cooled cookies and let them set for 15 minutes; the smooth surface is key for speckling.
- Speckle the Cookies:
- Mix cocoa, water, and vanilla for speckling, dip your brush, and flick bristles gently over cookies—protect your work area from splatters.
- Let Dry:
- Leave cookies until icing is fully dry before serving or storing; patience pays off here.
 Save to Pinterest
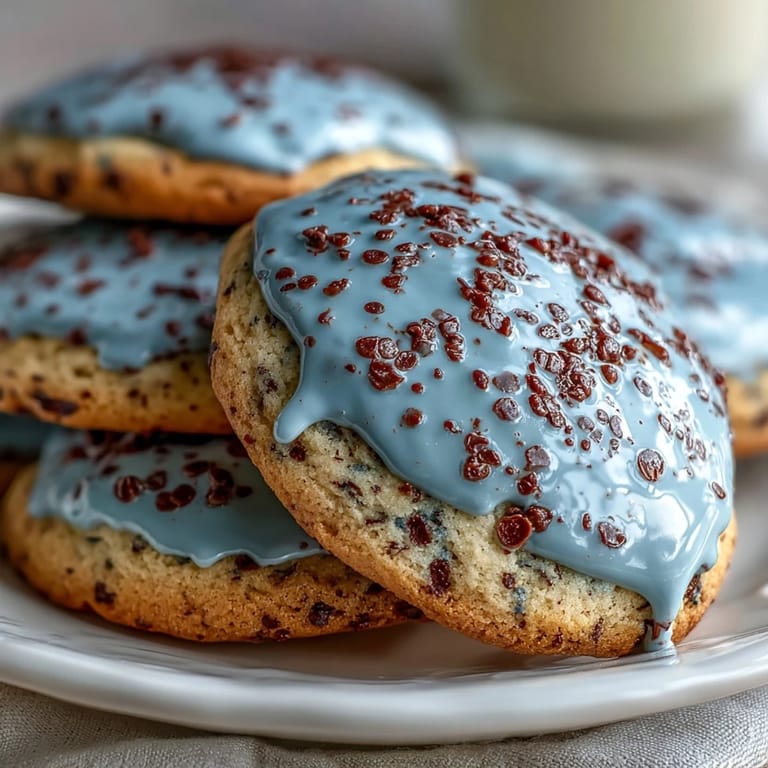
 When I baked these cookies for my cousin&aposs baby shower, my aunt gasped and insisted they were too pretty to eat—but then everyone devoured them anyway. The laughter lingering around the table made these humble treats feel almost magical, and the cookies sparked stories about springtime traditions. It was the kind of moment where dessert turns ordinary gatherings into occasions. The simple act of sharing turned a batch of cookies into a memory bigger than its ingredients.
Speckling Without the Mess
After dusting the kitchen with a fine spray of cocoa more than once, I learned to lay down parchment and wear an apron before speckling. The flicking takes practice, but it&aposs a little thrill seeing chocolate spots land just right. If you&apossre hesitant, start with test cookies to find your rhythm. Even imperfect speckles end up charming on the pastel blue. And honestly, messy hands somehow make the process more fun.
Making It Ahead
I&apossve gotten in the habit of preparing the dough a day early, chilling it overnight, and then rolling and baking when I have more time. The flavors deepen just a bit, and cleanup feels more relaxed this way. You can also freeze dough discs for up to a month, thawing before rolling out. It&aposs a handy trick for when spring events pop up unexpectedly. The cookies keep beautifully for a week in airtight containers, so you can bake ahead without worry.
Getting Kids Involved and Saving Your Sanity
Letting kids help with speckling means accepting cocoa smears on faces and walls, but the laughter is worth the minor chaos. Small hands adore the painting part, and even mistakes turn into new cookie designs. If you set up a speckling station (with aprons and wipes nearby), it&aposs surprisingly smooth. Invite them to choose shapes and colors, and see how each batch reflects their style. The cookies never turn out exactly alike, and that&aposs the best part.
- Lay out a big sheet of parchment before speckling to minimize cleanup.
- Keep wipes handy for sticky fingers.
- Let the icing set before inviting helpers to decorate—less frustration all around.
 Save to Pinterest
 Spring cookies are a little celebration in every bite—share them with friends, and watch how quickly they disappear. Each robin&aposs egg cookie is a small reminder that the best treats are made with curiosity (and maybe a bit of cocoa on your nose).
Recipe FAQs
- → How do I achieve the blue color in these cookies?
Use blue gel food coloring for both the dough and icing. Add a few drops until your desired shade is reached, mixing gently to avoid overworking.
- → What tools are needed for making these cookies?
You'll need an electric mixer, mixing bowls, a rolling pin, egg or oval cookie cutters, baking sheets, parchment paper, and a wire rack. A food-safe paintbrush or clean toothbrush is essential for the speckling technique.
- → Can almond extract be omitted?
Yes, almond extract adds a subtle flavor, but it can be left out for a classic vanilla taste.
- → How long should the dough be chilled before rolling?
Chill the dough for at least 30 minutes to ensure it's easy to roll and cut without sticking.
- → How should I store these cookies?
Store cookies in an airtight container to keep them fresh for up to one week.
- → Are these suitable for vegetarians?
Yes, these cookies are vegetarian as they contain no meat or gelatin products.