 Save to Pinterest
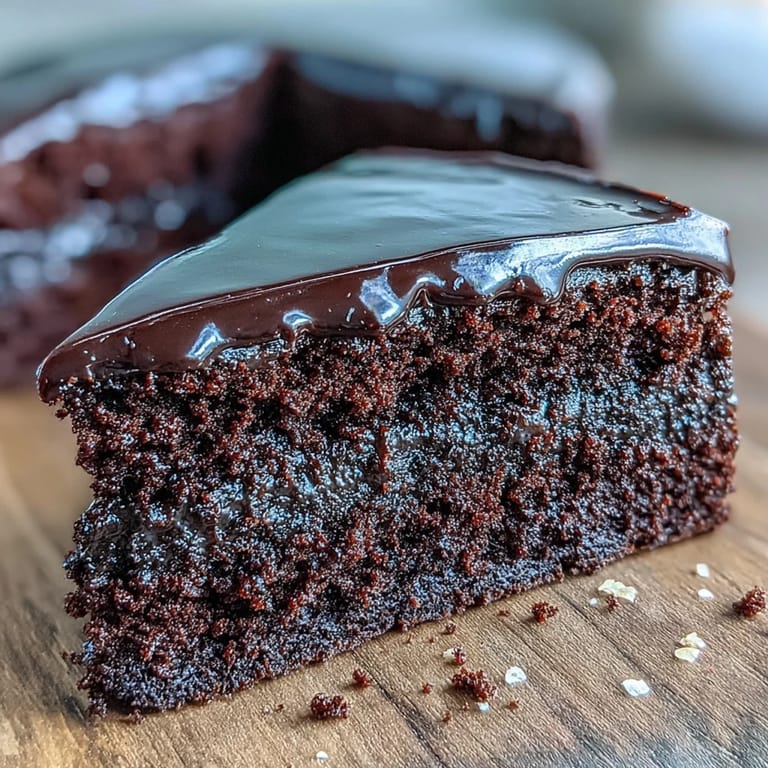
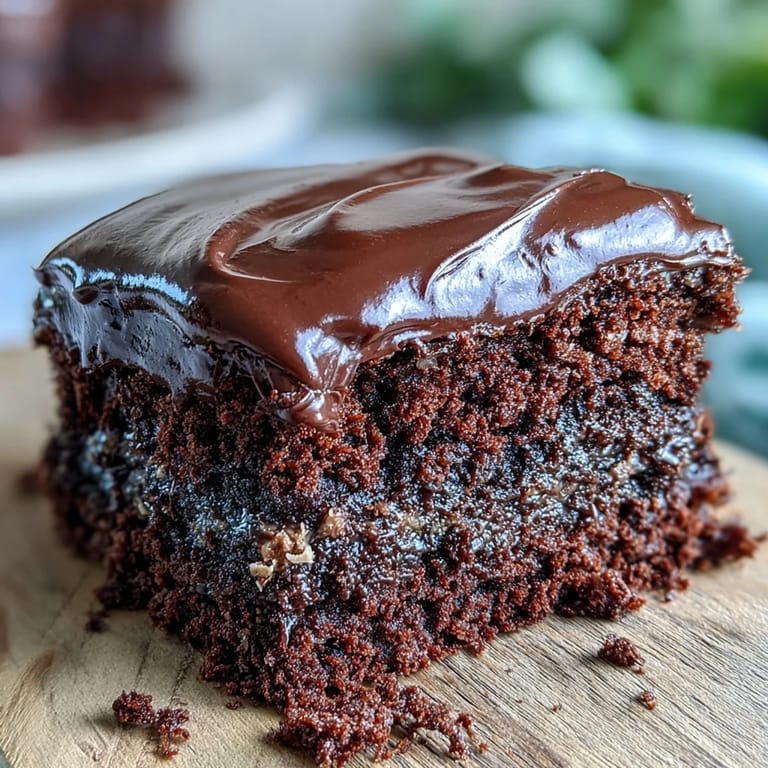
 The kitchen smelled like a chocolate shop that afternoon, windows fogged from the oven heat, and I knew I'd finally cracked it. This wasn't one of those dry, crumbly efforts I'd served apologetically before. The batter was glossy, almost too good to bake, and when those layers came out of the oven with their crackled tops and soft centers, I actually laughed out loud. Sometimes a recipe just works, and this one has never let me down since.
I made this for my neighbor's birthday once, stacking it hastily on a glass stand while she waited at the door. She took one forkful, closed her eyes, and declared it better than the bakery version she'd been buying for years. That moment taught me that homemade doesn't need to be perfect, it just needs to taste honest. The way the chocolate melts on your tongue, rich and slightly bitter, tells the whole story.
Ingredients
- Unsalted butter (200 g for cake, 100 g for icing, plus extra for greasing): Use proper butter, not margarine, because it carries the chocolate flavor and keeps the crumb tender without going greasy.
- Dark chocolate (200 g for cake, 150 g for icing, minimum 50% cocoa solids): Don't skimp on quality here, cheap chocolate seizes and tastes waxy, while good stuff melts into silk.
- Light brown sugar (250 g): The molasses adds moisture and a subtle caramel note that balances the bitterness of the cocoa.
- Large eggs (3): Room temperature eggs whisk up fluffier and blend more smoothly into the batter.
- Plain flour (200 g): Standard plain flour gives just enough structure without making the cake tough.
- Baking powder (1 ½ tsp): This is your lift, so check the date on the tin or your cake will stay flat.
- Fine sea salt (¼ tsp): A pinch sharpens the chocolate and stops it tasting one dimensional.
- Cocoa powder (50 g): Sift it or you'll get lumps that won't dissolve, I learned that the hard way.
- Whole milk (150 ml for cake, 3 tbsp for icing): Full fat is essential for richness, semi skimmed makes it taste a bit sad.
- Vanilla extract (1 tsp): Use real extract, not essence, it adds warmth without shouting.
- Icing sugar (200 g, sifted): Sifting is non negotiable or the icing will be gritty and unprofessional looking.
Tired of Takeout? 🥡
Get 10 meals you can make faster than delivery arrives. Seriously.
One email. No spam. Unsubscribe anytime.
Instructions
- Prepare Your Tins:
- Preheat the oven to 180°C (160°C fan) or 350°F, then grease two 20 cm round tins generously and line the bases with baking paper. This step saves heartbreak when the cakes refuse to budge later.
- Melt the Chocolate and Butter:
- Set a heatproof bowl over a pan of barely simmering water, add the 200 g butter and 200 g chopped dark chocolate, and stir gently until smooth and glossy. Let it cool for a few minutes so it doesn't scramble the eggs.
- Whisk the Eggs and Sugar:
- In a large bowl, whisk the 250 g light brown sugar and 3 eggs together until the mixture is pale, thick, and leaves a ribbon trail when you lift the whisk. This takes about three minutes by hand, less with an electric whisk.
- Combine Wet Ingredients:
- Stir the slightly cooled chocolate mixture into the whisked eggs and sugar, then add the vanilla extract. The batter will look luxuriously glossy at this point.
- Prepare Dry Ingredients:
- In a separate bowl, sift together the 200 g plain flour, 1 ½ tsp baking powder, ¼ tsp salt, and 50 g cocoa powder. Sifting aerates everything and prevents cocoa clumps.
- Fold and Mix:
- Gently fold the dry ingredients into the wet mixture in three additions, alternating with splashes of the 150 ml milk, until the batter is smooth and just combined. Overmixing makes it dense, so stop as soon as the flour disappears.
- Divide and Bake:
- Split the batter evenly between the two prepared tins, smooth the tops, and bake for 30 to 35 minutes. The cakes are done when a skewer comes out with a few moist crumbs, not wet batter.
- Cool the Cakes:
- Leave them in the tins for 10 minutes to firm up, then turn out onto a wire rack to cool completely. Rushing this step leads to crumbling disasters.
- Make the Icing:
- Melt 150 g dark chocolate and 100 g butter together over simmering water, then remove from heat and gradually beat in the 200 g sifted icing sugar and 3 tbsp milk. Keep beating until it's smooth, glossy, and spreadable.
- Assemble and Ice:
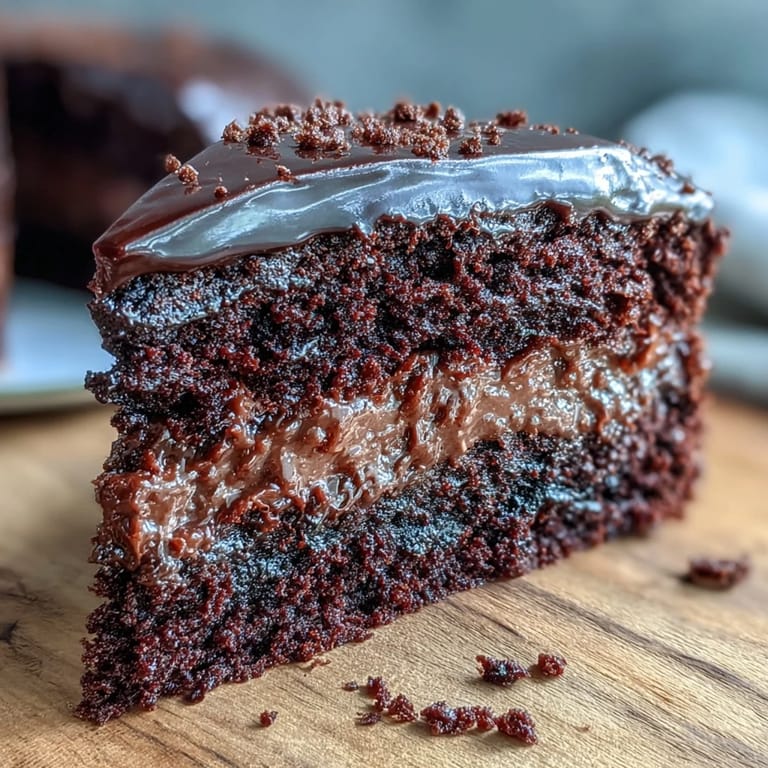
- Place one cooled cake layer on a serving plate, spread a generous third of the icing over it, then top with the second layer. Cover the top and sides with the remaining icing, smoothing with a palette knife for that professional finish.
 Save to Pinterest
 I remember slicing into this at a family gathering, the knife cutting cleanly through those fudgy layers, and watching everyone go quiet for a moment. Chocolate has that power, it turns a regular Tuesday into something worth remembering. The way the icing clings to the fork, the way the crumb melts on your tongue, it's the kind of cake that makes people ask for the recipe even before they've finished their slice.
Storing and Serving
This cake keeps beautifully in an airtight container for up to three days, though it rarely lasts that long in my house. The icing firms up slightly in the fridge, which some people prefer, but I like it at room temperature when the texture is at its softest. If you're serving it for a celebration, a handful of fresh raspberries or a dollop of whipped cream cuts through the richness and makes each slice feel a bit lighter.
Making It Your Own
Once you've made this a few times, you'll start experimenting without even thinking about it. I've added a layer of raspberry jam between the cakes for sharpness, swirled peanut butter into the batter for drama, and even dusted the top with crushed honeycomb for crunch. The base recipe is forgiving enough to handle tweaks, so trust your instincts and play around with flavors that make you happy.
What You'll Need
Beyond the ingredients, gather two 20 cm round cake tins, mixing bowls, a whisk (electric or hand), a heatproof bowl, a saucepan for the water bath, a palette knife or spatula for spreading, and a wire rack for cooling. Having everything ready before you start makes the whole process feel less frantic and more enjoyable.
- Check your baking powder is fresh, old stuff won't give you the rise you need.
- Use a kitchen scale for accuracy, cup measurements can vary wildly with flour and cocoa.
- Line your tins neatly so the cakes release cleanly and look professional from the start.
 Save to Pinterest
 There's something deeply satisfying about pulling a homemade chocolate cake from the oven, knowing it's going to make someone smile. I hope this one becomes a favorite in your kitchen, the way it has in mine.
Recipe FAQs
- → Can I use milk chocolate instead of dark chocolate?
Yes, but the cake will be sweeter and less rich. Dark chocolate with at least 50% cocoa solids provides the best depth of flavor and balanced sweetness.
- → How do I know when the cake is done?
Insert a skewer into the center—it should come out with a few moist crumbs, not wet batter. The cake should also spring back lightly when touched.
- → Can I make this cake in advance?
Absolutely. The un-iced cake layers can be wrapped tightly and stored for up to 2 days, or frozen for up to 3 months. Ice on the day of serving for best results.
- → Why is my icing too runny?
The chocolate mixture may have been too warm when you added the icing sugar. Let it cool slightly and beat well. If still runny, chill for 10-15 minutes until it thickens to spreading consistency.
- → Can I make this as a single layer cake?
Yes, use a 23 cm (9-inch) round tin and bake for 40-45 minutes. You'll have a thicker single layer that can be iced on top and sides with the same amount of icing.
- → What can I substitute for whole milk?
Semi-skimmed milk works well, though whole milk gives the richest texture. For dairy-free, use oat or almond milk, ensuring the rest of your ingredients are also dairy-free.