 Save to Pinterest
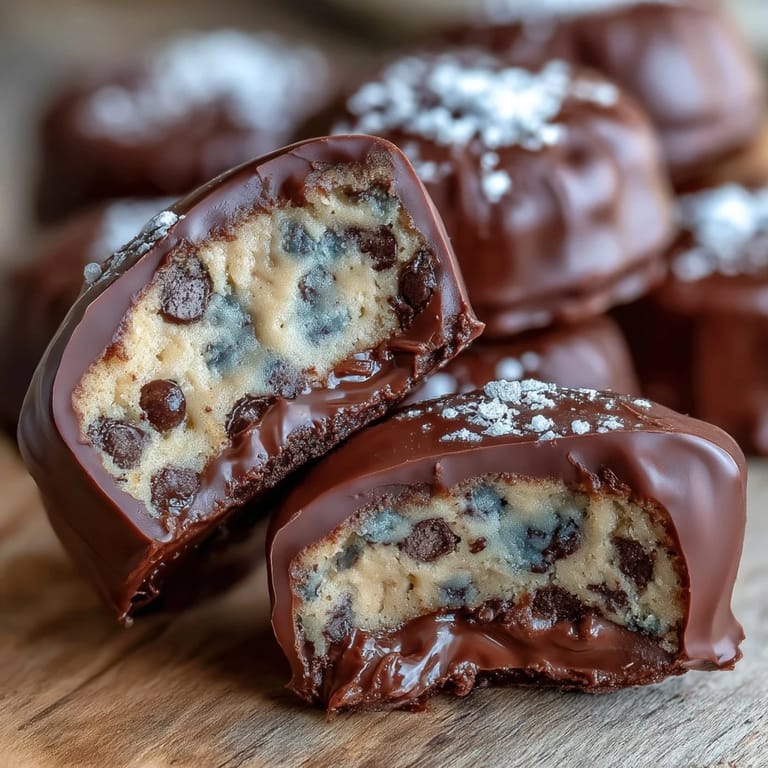
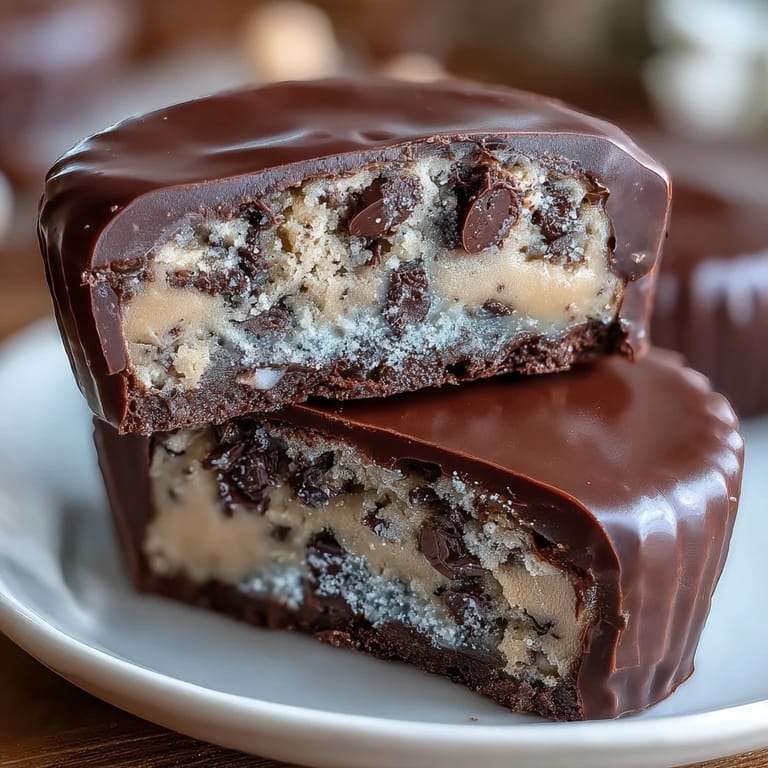
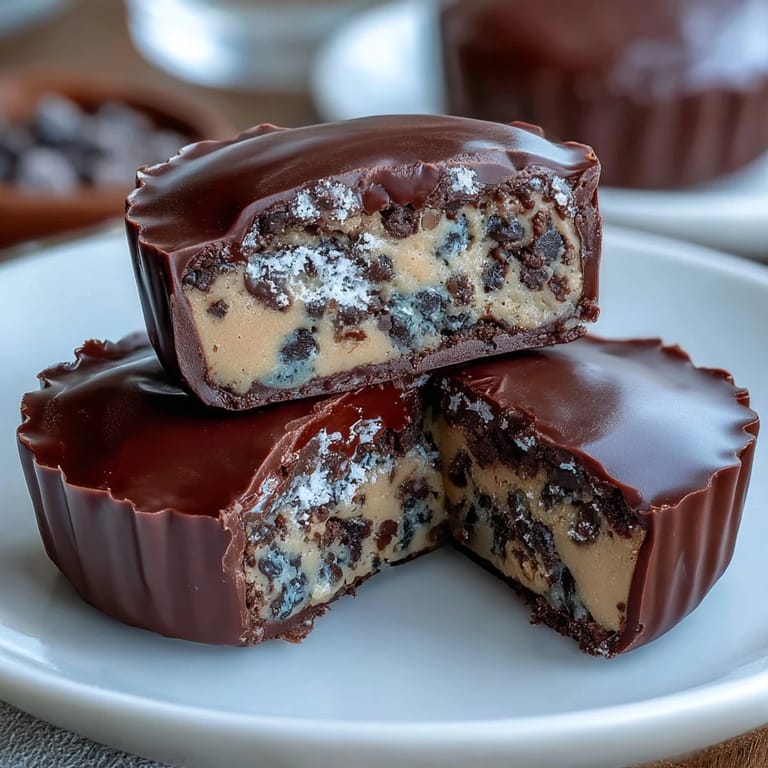
 My friend texted me a photo of a candy shop display case filled with peanut butter cups, followed by three words: "But make homemade." That simple challenge sparked an afternoon of kitchen experiments where I realized the magic wasn't just chocolate and peanut butter—it was layering in something unexpected. The moment I pressed that first spoonful of eggless cookie dough into the center, I knew I'd stumbled onto something better than the original.
I made a batch for my neighbor who had just moved in, and she took one bite on her porch step, closed her eyes, and didn't say a word for a solid ten seconds. When she finally spoke, she just asked if I could teach her how to make them. We ended up in her kitchen the following Saturday morning, laughing at how finicky the chocolate coating can be, and she's been making them for her book club ever since.
Ingredients
- Unsalted butter (1/4 cup softened, 2 tbsp melted): The softened butter creams with the sugars to give the cookie dough that tender, almost fudgy texture, while the melted butter in the peanut butter layer adds richness without making it greasy.
- Light brown sugar and granulated sugar: The combination gives you moisture and depth; brown sugar brings molasses notes that feel more authentic to real cookie dough.
- Vanilla extract: Just half a teaspoon, but it's the bridge between all three layers, tying everything together with a subtle warmth.
- Milk: A tablespoon keeps the dough tender and bindable without needing eggs; use almond or oat milk if you prefer dairy-free.
- Heat-treated all-purpose flour: This is non-negotiable for food safety with raw dough; microwave it for one minute (stirring halfway) or bake it first, and let it cool completely before mixing.
- Salt: A tiny pinch in the dough and another in the peanut butter layer brightens every flavor.
- Mini chocolate chips: Their small size distributes evenly throughout the dough, giving you little pockets of chocolate in every bite.
- Creamy peanut butter: Don't use the natural kind with separated oil unless you're okay with a slightly grainier texture; standard creamy peanut butter gives you smooth, spreadable consistency.
- Powdered sugar: Just enough to sweeten the peanut butter layer without making it gritty or overly sweet.
- Semisweet or milk chocolate chips: Semisweet gives you a balanced chocolate flavor; milk chocolate makes them sweeter and more approachable if you're making these for kids.
- Coconut oil or vegetable oil: A couple of teaspoons thin out the melted chocolate so it coats smoothly without pooling or cracking as it sets.
Tired of Takeout? 🥡
Get 10 meals you can make faster than delivery arrives. Seriously.
One email. No spam. Unsubscribe anytime.
Instructions
- Make the cookie dough base:
- Cream the softened butter with both sugars until the mixture looks pale and fluffy, which takes about two minutes with an electric mixer. Add vanilla and milk, then fold in your heat-treated flour and salt until just combined, being careful not to overmix.
- Fold in the chocolate chips:
- Stir in the mini chocolate chips by hand so they're evenly distributed, then refrigerate the dough while you work on the chocolate coating.
- Set up your muffin tin:
- Line a 12-cup muffin tin with paper liners; this makes removal infinitely easier later and keeps your fingers less chocolatey.
- Melt the chocolate:
- Combine chocolate chips and coconut oil in a microwave-safe bowl and heat in 30-second bursts, stirring between each one until completely smooth. Overheating chocolate makes it seize and become grainy, so patience here pays off.
- Create the chocolate base:
- Spoon about a tablespoon of melted chocolate into each liner, then tilt or tap the tin so it coats the bottom evenly. Freeze for ten minutes until set and no longer glossy.
- Mix the peanut butter layer:
- While the chocolate base sets, whisk together creamy peanut butter, melted butter, powdered sugar, and a pinch of salt until completely smooth. This should take less than a minute and should feel almost spreadable.
- Layer the peanut butter:
- Remove the muffin tin from the freezer and drop a heaping teaspoon of peanut butter mixture onto the chocolate in each cup, then gently flatten it with the back of a small spoon so it covers the chocolate base.
- Add the cookie dough:
- Scoop about a teaspoon of chilled cookie dough and press it gently onto the peanut butter layer in each cup, creating an even layer. The cold dough should hold its shape without crumbling.
- Seal with chocolate:
- Top each cup with enough melted chocolate to completely cover the fillings, then use a small spoon or offset spatula to smooth the tops flat. Work quickly since the chocolate sets fast, but don't rush or you'll disturb the layers beneath.
- Final chill:
- Refrigerate for at least twenty minutes, or freeze for faster setting, until the chocolate is completely firm and no longer soft to the touch.
 Save to Pinterest
 There's something almost meditative about the moment you bite through that thin chocolate shell and hit the peanut butter layer, then taste that cookie dough center with its little chocolate chips. These treats stopped being just candy the first time someone asked me to make them for a birthday gift, and I realized I'd accidentally created an edible love letter to two of the most comforting flavors we have.
Why This Combination Works
Cookie dough and peanut butter cups seem like they shouldn't belong together, but they actually balance each other perfectly. The warm butter and brown sugar notes in the dough complement the salty richness of peanut butter, while the chocolate holds everything together like the mediator between two good friends. When you add that eggless element, you're giving people permission to indulge without worry, which somehow makes it taste even better.
Storage and Make-Ahead Magic
These keep beautifully in an airtight container in the refrigerator for up to two weeks, though honestly they rarely last that long. You can also freeze them for up to a month, and there's something wonderful about having homemade candy waiting in your freezer for unexpected guests or a moment when you need a small joy.
Customization Ideas That Actually Work
Once you've made these once, you'll start imagining variations, and that's when the real fun begins. The basic structure is so forgiving that you can experiment with different chocolate types, add a tiny sprinkle of flaky sea salt on top before the final chill, or even swap in almond butter if that's your preference. Just remember that any major ingredient swap might affect the texture slightly, so take notes if you want to recreate your favorite version.
- Dark chocolate makes these elegantly sophisticated, especially if you top each cup with a flake of sea salt before it sets.
- Sprinkle the tops with a pinch of crushed pretzels or chopped roasted peanuts for texture contrast.
- If you love cookies and cream, fold in finely crushed vanilla wafers instead of chocolate chips for a completely different flavor profile.
 Save to Pinterest
 Making candy at home sounds intimidating until you realize it's just chocolate, peanut butter, and cookie dough stacked thoughtfully. These gifts feel luxurious and taste impossible, even though you made them yourself on an ordinary afternoon.
Recipe FAQs
- → How is the cookie dough made safe to eat?
Heat-treating the flour by microwaving or baking kills harmful bacteria, making the raw dough safe for consumption.
- → Can I use dairy-free alternatives in this dessert?
Yes, almond or oat milk can replace regular milk, and dairy-free butter substitutes work well in the dough and peanut butter layer.
- → What type of chocolate works best for coating?
Semisweet or milk chocolate chips melt smoothly and complement the peanut butter and cookie dough layers. Dark chocolate is a great option for a richer taste.
- → How long should the cups chill before serving?
Chilling for at least 20 minutes allows the chocolate to set firmly and the layers to meld together for easy handling.
- → Are there any common allergens in these peanut butter cups?
Yes, they contain peanuts, milk, wheat (gluten), and soy depending on the chocolate chips used. Check labels carefully if allergies are a concern.